Search
  • Conseils de Jardinage
    • Jardinage en Pots
    • Aménagements Paysagers
    • Astuces de Jardinage
    • Jardinage à Faire Soi-Même
    • Jardinage en Pots
    • Jardins Spéciaux
    • Notions de Base
    • Problèmes de Jardinage
  • Jardins Ornementaux
    • Arbres
    • Arbustes
    • Bulbes
    • Cactus et Plantes Succulentes
    • Feuillage
    • Fleurs
    • Plantes Annuelles
    • Plantes Couvre-Sol
    • Plantes d’Intérieur
    • Plantes Grimpantes
    • Plantes Vivaces
  • Idées de Jardin
Reading: Planter des roses trémières à partir de racines nues
Share
Secretsdejardin.com
Secretsdejardin.comSecretsdejardin.com
Font ResizerAa
  • Conseils de Jardinage
  • Jardins Ornementaux
  • Idées de Jardin
Search
  • Conseils de Jardinage
    • Jardinage en Pots
    • Aménagements Paysagers
    • Astuces de Jardinage
    • Jardinage à Faire Soi-Même
    • Jardinage en Pots
    • Jardins Spéciaux
    • Notions de Base
    • Problèmes de Jardinage
  • Jardins Ornementaux
    • Arbres
    • Arbustes
    • Bulbes
    • Cactus et Plantes Succulentes
    • Feuillage
    • Fleurs
    • Plantes Annuelles
    • Plantes Couvre-Sol
    • Plantes d’Intérieur
    • Plantes Grimpantes
    • Plantes Vivaces
  • Idées de Jardin
Have an existing account? Sign In
Follow US
© Foxiz News Network. Ruby Design Company. All Rights Reserved.
Fleurs

Planter des roses trémières à partir de racines nues

By [email protected]
4 mois ago
4 Min Read
Share

Contenu de cet article
Prepare the plantsPrepare the groundPlant the rootsFill & PatinWater and Mulch

Are you searching for a perennial to make your flower garden stand out? Hollyhocks, with their long, elegant stems and vibrant blossoms, are one of my favorite garden additions. They can grow up to eight feet tall and are able to reseed themselves. Hollyhock plants only survive for two to three years, but the seed pods will drop and grow, creating a bed of blooms that can last forever.

How do you plant hollyhocks? You can plant them either by seed or by bare root. I prefer bare root propagation, and below I have outlined some simple planting steps.

Prepare the plants

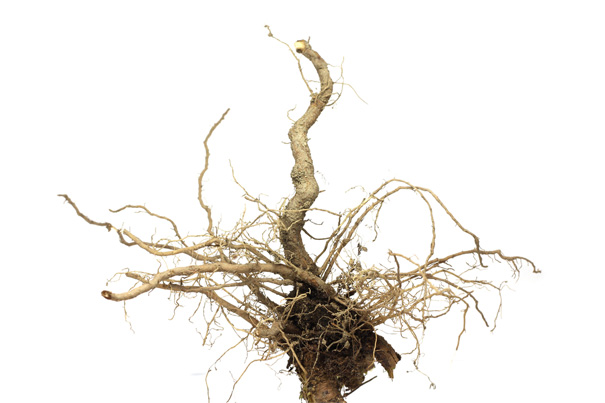
Bare root hollyhocks are sold during their dormant stage. They usually come wrapped in plastic, surrounded by a soft cushion of peat moss, mulch or sawdust. Gently remove the bare roots from the packaging and shake off the packaging materials.

Trim off any damaged areas of the roots.

Fill a bucket with water, then allow the hollyhock roots to soak for a few hours, or even overnight. Soaking will help moisten the roots and prepare them to grab onto the soil and grow.

Prepare the ground

The best time to plant bare root hollyhocks is in the early spring or late winter, preferably a week or two before the last frost. Choose a sunny location that is protected from strong winds.

As the roots soak, start digging the planting hole. Using a small gardening shovel, dig a hole twice as deep and twice as wide as the roots. To give your hollyhock a better chance of rooting properly, and to make the planting process easier for you, you can create a mound inside the planting hole. You will want it to look like an upside down saucer, with a raised part in the middle and a moat all around it.

Then, using the long handle of a gardening tool, poke a hole in the center of the mound, making the hole just wide enough for the taproot – the long spindly central root – to rest inside.

Plant the roots

Place the taproot in the hole in the middle of your mound. Gently spread the spindly parts of the root around the mound, dangling into the moat. Creating the mound makes it easier to fill in the hole since the root will rest atop the hill all by itself without you needing to support it with one hand and fill with the other.

Fill & Patin

Backfill the hole with the dirt that you displaced. Firmly pat the dirt all around the roots to reduce air pockets and make sure that every portion of the root has soil within easy reach.

After you finish filling in the dirt, you can create another mound, similar to the one you made inside the hole. Again, make an upside-down saucer shape with a moat around the outside of the central mound. This shape will help the soil hold water.

Water and Mulch

Use a watering can to give the newly potted hollyhock a little shower. Make sure you fill up the moat to allow the water to seep down into the soil.

Place organic mulch around the mound to help the soil retain moisture.

Related Articles

  • Hollyhock Growing Guide: Complete Guide On Care and Maintenance
  • How to Transplant Hollyhocks
  • The Different Types & Varieties of Hollyhocks
  • How to Deadhead Hollyhocks
TAGGED:astuces de jardinageconseils de jardinagecultiver des rosesentretien des fleursfleurshorticulturejardin fleurijardinageplanter rosesplantes de jardinplantes vivacesracines nuesroses trémièressaison de plantation
Share This Article
Facebook Email Copy Link Print
Leave a Comment

Laisser un commentaire Annuler la réponse

Votre adresse e-mail ne sera pas publiée. Les champs obligatoires sont indiqués avec *

About Me

Hello, I am Cat!

Photography is a way of feeling, of touching, of loving. What you have caught on film is captured forever… It remembers little things, long after you have forgotten everything.

Follow Socials

You Might Also Like

Plantes d’Intérieur

Pourquoi les boutons floraux de mon cactus de Noël tombent-ils ?

4 mois ago
4 Min Read
Fleurs

9 Magnifiques Variétés de Fuchsias

4 mois ago
6 Min Read
Fleurs

Astuces pour cultiver une élégante phacélie en dentelle

4 mois ago
4 Min Read
Show More

Explore Ruby Cat World

Gallery
  • # Find More:
  • About Me
  • Contact
  • Life
  • Style
  • Finds
© Foxiz News Network. Ruby Design Company. All Rights Reserved.
Welcome Back!

Sign in to your account

Username or Email Address
Password

Lost your password?